Snowflake Assets
Bruin supports Snowflake as a data platform.
Connection
To set up a Snowflake connection, add a snowflake connection to the connections section of your .bruin.yml file. The examples below show the supported fields, followed by how to obtain each value.
Snowflake connections support two authentication methods:
- Password authentication: provide
usernameandpassword. - Key-pair authentication: provide
usernameand eitherprivate_key_pathorprivate_key.
Both methods use the same Snowflake account, database, schema, warehouse, role, and region fields. Choose one authentication method and configure it as shown below.
Connection Parameters
Each parameter has a short heading for the page outline. Expand the details below a parameter to see where to find it in Snowflake and how to get it with a command or query.
name
How to choose this value
This is the Bruin connection name, not a Snowflake value. Choose a stable name such as snowflake-default; you will use it when selecting this connection from pipelines or commands.
Programmatic method: list the Snowflake connection names already configured in Bruin, then choose a new unique name or reuse an existing one.
bruin connections listusername
How to find this value
Use the Snowflake username that Bruin should connect as. In the Snowflake UI, you can find users under Admin > Users & Roles.
Programmatic method: if you are logged in as the same user, run:
SELECT CURRENT_USER();If you are an admin checking a specific user, run:
SHOW USERS LIKE '<username>';password
How to set this value
Use this only for password authentication. Snowflake does not let you retrieve an existing password, so use the password that was set for the user or reset it.
Programmatic method: an admin can set a new password with:
ALTER USER <username> SET PASSWORD = '<new_password>';account
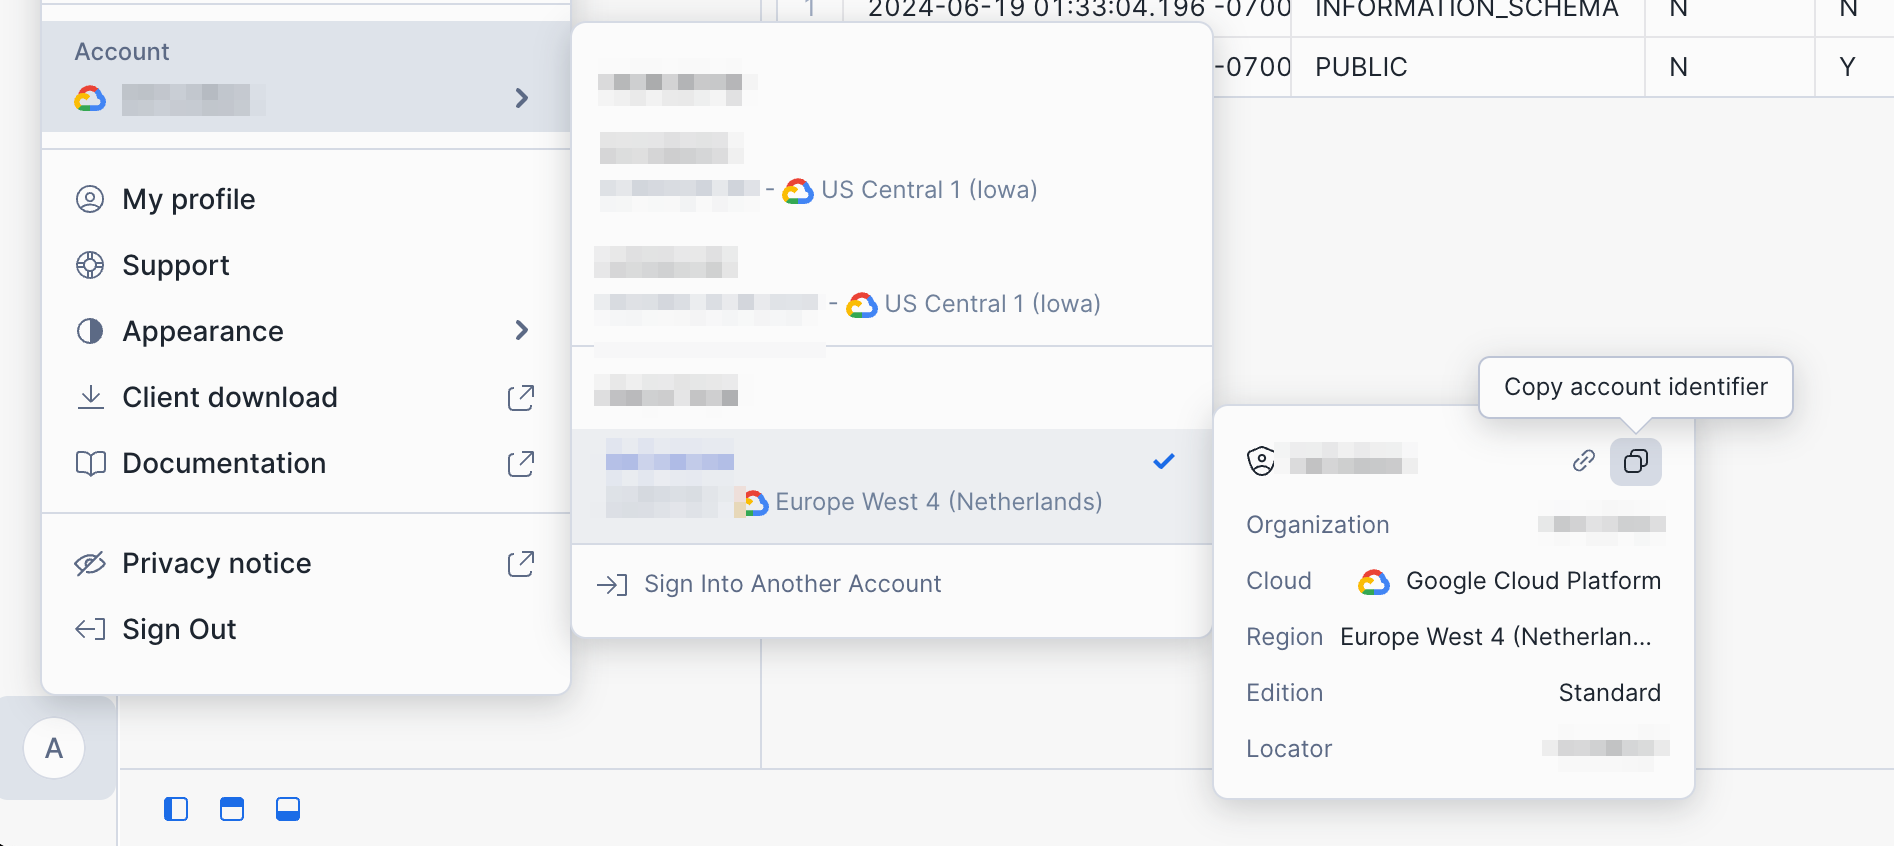
How to find this value
This is the Snowflake account identifier, usually in the format <organization_name>-<account_name>. In the Snowflake UI, you can find it under Account Details:
Programmatic method: run this in a Snowflake SQL worksheet/file:
SELECT CURRENT_ORGANIZATION_NAME() || '-' || CURRENT_ACCOUNT_NAME() AS account_identifier;database
How to find this value
Use the database that contains, or should contain, the schemas and tables Bruin will work with. In the Snowflake UI, go to Data > Databases.
Programmatic method: list the databases you can access:
SHOW DATABASES;If your worksheet already has a database selected, you can also run:
SELECT CURRENT_DATABASE();schema
How to find or create this value
Use the schema where Bruin should create or read objects. In the Snowflake UI, go to Data > Databases, open your database, and look under Schemas. You can use an existing schema such as PUBLIC, or create generic project schemas such as RAW, SILVER, and GOLD.
Programmatic method: list schemas in a database:
SHOW SCHEMAS IN DATABASE <database_name>;For a simple demo setup, use RAW. To create it, run:
CREATE SCHEMA IF NOT EXISTS raw;If Snowflake says the session does not have a current database, use a qualified schema name:
CREATE SCHEMA IF NOT EXISTS <database_name>.raw;Or set the database first:
USE DATABASE <database_name>;
CREATE SCHEMA IF NOT EXISTS raw;
warehouse
How to find this value
Use the warehouse Bruin should use for query execution. In the Snowflake UI, go to Admin > Warehouses. Common names include COMPUTE_WH, XSMALL_WH, and LOAD_WH.
Programmatic method: list warehouses available to you:
SHOW WAREHOUSES;If your worksheet already has a warehouse selected, you can also run:
SELECT CURRENT_WAREHOUSE();For a simple demo setup, COMPUTE_WH is often the easiest value to try.
role
How to find this value
This is optional. Use it when Bruin should run with a specific Snowflake role. In the Snowflake UI, go to Admin > Users & Roles > Roles.
Programmatic method: show the role currently active in your worksheet:
SELECT CURRENT_ROLE();To inspect roles granted to a user, run:
SHOW GRANTS TO USER <username>;region
How to find this value
This is the Snowflake account region. In the Snowflake UI, you can find it under Account Details.
Programmatic method: run:
SELECT CURRENT_REGION();private_key_path
How to get this value
Use this only for key-pair authentication. It is the local path to the private key file generated for Bruin, such as rsa_key.p8.
Programmatic method: after generating the key, print its absolute path from your terminal:
realpath rsa_key.p8private_key
How to get this value
Use this only for key-pair authentication when you want to paste the private key contents directly into .bruin.yml instead of referencing a file path.
Programmatic method: print the private key contents from your terminal:
cat rsa_key.p8Password Authentication
    connections:
      snowflake:
        - name: "connection_name"
          username: "sfuser"
          password: "XXXXXXXXXX"
          account: "organization-account"
          database: "dev"
          schema: "schema_name" # optional
          warehouse: "warehouse_name" # optional
          role: "data_analyst" # optional
          region: "eu-west1" # required
Key-Pair Authentication
For key-pair authentication, first generate a private/public key pair and register the public key with your Snowflake user. Then configure Bruin with the private key. Bruin can read the private key from a file path or directly from the .bruin.yml file.
Step 1: Generate a key pair
Open your terminal and run the following command to create a key pair. If you’re using a Mac, OpenSSL should be installed by default, so no additional setup is required. For Linux or Windows, you may need to install OpenSSL first.
openssl genrsa 2048 | openssl pkcs8 -topk8 -inform PEM -out rsa_key.p8 -nocrypt
openssl rsa -in rsa_key.p8 -pubout -out rsa_key.pub
Step 2: Set the public key for your Snowflake user
Log into Snowflake as an admin, create a new SQL worksheet/file, and run the following command (don't forget the single quotes around the key). When pasting the public key from the .pub file, exclude the -----BEGIN PUBLIC KEY----- and -----END PUBLIC KEY----- lines:
ALTER USER your_snowflake_username
SET RSA_PUBLIC_KEY='your_public_key_here';
Step 3: Verify the public key in Snowflake
DESC USER your_snowflake_username;This will show a column named RSA_PUBLIC_KEY. You should see your actual key there.
Step 4: Configure Bruin with the private key
Choose one of the following private-key options in your .bruin.yml file.
Option 1: Private key file path
    connections:
      snowflake:
        - name: "connection_name"
          username: "sfuser"
          account: "organization-account"
          database: "dev"
          schema: "schema_name" # optional
          warehouse: "warehouse_name" # optional
          role: "data_analyst" # optional
          region: "eu-west1" # required
          private_key_path: "path/to/private_key" # required for this option
Option 2: Private key content
    connections:
      snowflake:
        - name: "connection_name"
          username: "sfuser"
          account: "organization-account"
          database: "dev"
          schema: "schema_name" # optional
          warehouse: "warehouse_name" # optional
          role: "data_analyst" # optional
          region: "eu-west1" # required
          private_key: |
            -----BEGIN PRIVATE KEY-----
            OEKLvQIBADANBgkqhkiG9w0BAQEFAASCBKcwggSjAgEIAoIBAQC0Xc2pIYcLxdve
            E+J5c5f...
            -----END PRIVATE KEY-----
For more details on how to set up key-pair authentication, see this guide.
Query Tags
Bruin automatically sets Snowflake's QUERY_TAG on every query it executes when the --query-annotations flag is enabled. This makes it easy to trace queries back to their source asset and pipeline in Snowflake's QUERY_HISTORY.
The tag is a JSON string containing:
| Field | Description |
|---|---|
asset | The name of the asset being executed |
type | The query type, e.g. main |
pipeline | The pipeline the asset belongs to |
Adding custom metadata to query tags
You can include your own key-value pairs in the query tag by using the tags and meta fields on the asset definition. The meta fields are merged directly into the tag JSON, and tags is included as an array.
/* @bruin
name: events.install
type: sf.sql
materialization:
    type: table

tags:
  - production
  - critical

meta:
  owner: data-team
  cost-center: engineering
@bruin */

select user_id, ts, platform, country
from analytics.events
where event_name = "install"
This produces a query tag like:
{"asset":"events.install","type":"main","pipeline":"my_pipeline","owner":"data-team","cost-center":"engineering","tags":["production","critical"]}You can query these tags in Snowflake:
select
    query_id,
    parse_json(query_tag):asset::string as asset,
    parse_json(query_tag):pipeline::string as pipeline,
    parse_json(query_tag):owner::string as owner
from table(information_schema.query_history())
where try_parse_json(query_tag):asset is not null
order by start_time desc;
Overriding the warehouse per asset
By default, Bruin runs every query on the warehouse configured on the connection. You can override the warehouse for a specific asset with a warehouse parameter. When set, Bruin runs that asset on a dedicated Snowflake connection whose warehouse is the overridden one, without changing the connection default used by other assets.
If the overridden warehouse can't be used (for example the role lacks USAGE on it, or the account can't resume it), Bruin logs a warning and falls back to the connection's default warehouse so the run isn't broken by the override.
/* @bruin
name: events.install
type: sf.sql
materialization:
    type: table

parameters:
    warehouse: BIG_WH
@bruin */

select user_id, ts, platform, country
from analytics.events
where event_name = 'install'
Overriding the warehouse at run time (urgent reruns)
The warehouse parameter supports Jinja templating, so you can drive it from a pipeline variable and override it at run time for one-off urgent reruns on a larger warehouse — without editing the asset.
Reference a warehouse variable in the asset and declare its default in pipeline.yml:
/* @bruin
name: events.install
type: sf.sql
materialization:
    type: table

parameters:
    warehouse: "{{ var.warehouse }}"
@bruin */

select user_id, ts, platform, country from analytics.events# pipeline.yml
variables:
warehouse:
type: string
default: COMPUTE_WHNormal runs use the default (COMPUTE_WH). For an urgent rerun, override it for that single run with --var:
bruin run --var '{"warehouse":"BIG_WH"}' ./my-pipelineSnowflake Assets
sf.sql
Runs a materialized Snowflake asset or a Snowflake script. For detailed parameters, you can check Definition Schema page.
Asset names may be table, schema.table, or database.schema.table. With a three-part name Bruin auto-creates both the database (CREATE DATABASE IF NOT EXISTS) and the schema within it, so the connection's role needs the CREATE DATABASE privilege.
Example: Create a table using table materialization
/* @bruin
name: events.install
type: sf.sql
materialization:
    type: table
@bruin */

select user_id, ts, platform, country
from analytics.events
where event_name = "install"
Example: Run a Snowflake script
/* @bruin
name: events.install
type: sf.sql
@bruin */

create temp table first_installs as
select
    user_id,
    min(ts) as install_ts,
    min_by(platform, ts) as platform,
    min_by(country, ts) as country
from analytics.events
where event_name = "install"
group by 1;

create or replace table events.install
select
    user_id,
    i.install_ts,
    i.platform,
    i.country,
    a.channel,
from first_installs as i
join marketing.attribution as a
    using(user_id)
sf.sensor.table
Sensors are a special type of assets that are used to wait on certain external signals.
Checks if a table exists in Snowflake, runs by default every 30 seconds until this table is available.
name: string
type: string
parameters:
    table: string
    poke_interval: int (optional)
timeout: duration (optional)Parameters:
table: Indatabase_id.schema_id.table_idorschema_id.table_idformat. Ifschema_id.table_idis provided, the database will be taken from the database configuration in the.bruin.yml.poke_interval: The interval between retries in seconds (default 30 seconds).timeout: How long to wait before the sensor fails. Uses single-unit duration syntax (s,m,h,d,ms,ns), e.g.1hor90m. Defaults to24h. See Sensor Timeout.
sf.sensor.query
Checks if a query returns any results in Snowflake, runs by default every 30 seconds until this query returns any results.
name: string
type: string
parameters:
    query: string
    poke_interval: int (optional)
    timeout: duration (optional)
Parameters:
query: Query you expect to return any resultspoke_interval: The interval between retries in seconds (default 30 seconds).timeout: How long to wait before the sensor fails. Uses single-unit duration syntax (s,m,h,d,ms,ns), e.g.1hor90m. Defaults to24h. See Sensor Timeout.
Example: Partitioned upstream table
Checks if the data available in upstream table for end date of the run.
name: analytics_123456789.events
type: sf.sensor.query
parameters:
    query: select exists(select 1 from upstream_table where dt = "{{ end_date }}")
Example: Streaming upstream table
Checks if there is any data after end timestamp, by assuming that older data is not appended to the table.
name: analytics_123456789.events
type: sf.sensor.query
parameters:
    query: select exists(select 1 from upstream_table where inserted_at > "{{ end_timestamp }}")
sf.seed
sf.seed is a special type of asset used to represent CSV files that contain data that is prepared outside of your pipeline that will be loaded into your Snowflake database. Bruin supports seed assets natively, allowing you to simply drop a CSV file in your pipeline and ensuring the data is loaded to the Snowflake database.
You can define seed assets in a file ending with .asset.yml or .asset.yaml:
name: dashboard.hello
type: sf.seed

parameters:
path: seed.csvParameters:
path: The path to the CSV file that will be loaded into the data platform. This can be a relative file path (relative to the asset definition file) or an HTTP/HTTPS URL to a publicly accessible CSV file.
WARNING
When using a URL path, column validation is skipped during bruin validate. Column mismatches will be caught at runtime.
Examples: Load csv into a Snowflake database
The examples below show how to load a CSV into a Snowflake database.
name: dashboard.hello
type: sf.seed

parameters:
    path: seed.csv
Example CSV:
name,networking_through,position,contact_date
Y,LinkedIn,SDE,2024-01-01
B,LinkedIn,SDE 2,2024-01-01
sf.source
Defines Snowflake source assets for documenting existing tables and views in your Snowflake database. These assets are no-op (they don't execute), but are useful for:
- Documenting existing Snowflake tables and views
- Adding column descriptions and metadata
- Establishing lineage relationships
- Query preview functionality in the VSCode extension
Example: Document an existing Snowflake table
name: RAW.CUSTOMER_DATA
type: sf.source
description: "Raw customer data ingested from the CRM system"
connection: snowflake-default

tags:
  - raw
  - crm
domains:
  - customers

meta:
  business_owner: "Customer Success Team"
  data_steward: "data-eng@company.com"
  refresh_frequency: "daily"

depends:
  - RAW.CRM_SYNC

columns:
  - name: CUSTOMER_ID
    type: "NUMBER"
    description: "Unique identifier for each customer"
  - name: FIRST_NAME
    type: "VARCHAR"
    description: "Customer first name"
  - name: LAST_NAME
    type: "VARCHAR"
    description: "Customer last name"
  - name: SIGNUP_DATE
    type: "TIMESTAMP_NTZ"
    description: "Date and time the customer signed up"
  - name: ACCOUNT_STATUS
    type: "VARCHAR"
    description: "Current account status such as active, inactive, or suspended"