Tabs Overview
These tabs give you direct access to view and manage details of the currently open Bruin asset.
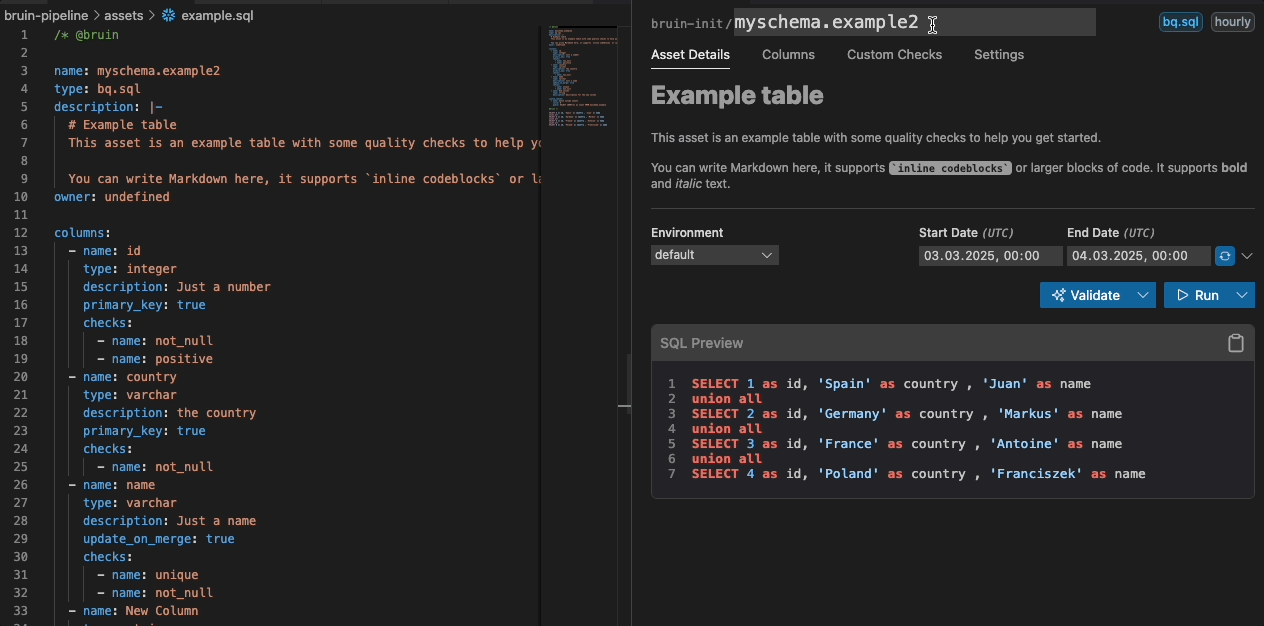
1. General
This tab provides a comprehensive view of your asset, allowing you to manage key information and execute actions directly from the UI.
- Pipeline & Asset Name: Displays the current pipeline and asset names. The asset name can be updated from the UI.
- Pipeline Schedule & Asset Type: Displays the current pipeline schedule and asset type as tags.
- Description: View or edit the asset’s description to document its purpose.
- Environment Dropdown: Seamlessly switch between environments (e.g.,
development,production). - Date Inputs:
- Customize the date/time for runs directly within the UI.
- A refresh button allows synchronization with the pipeline schedule.
- Note: The time is specified in
UTC.
- SQL Preview: Displays a preview of the SQL query related to the asset for quick inspection.
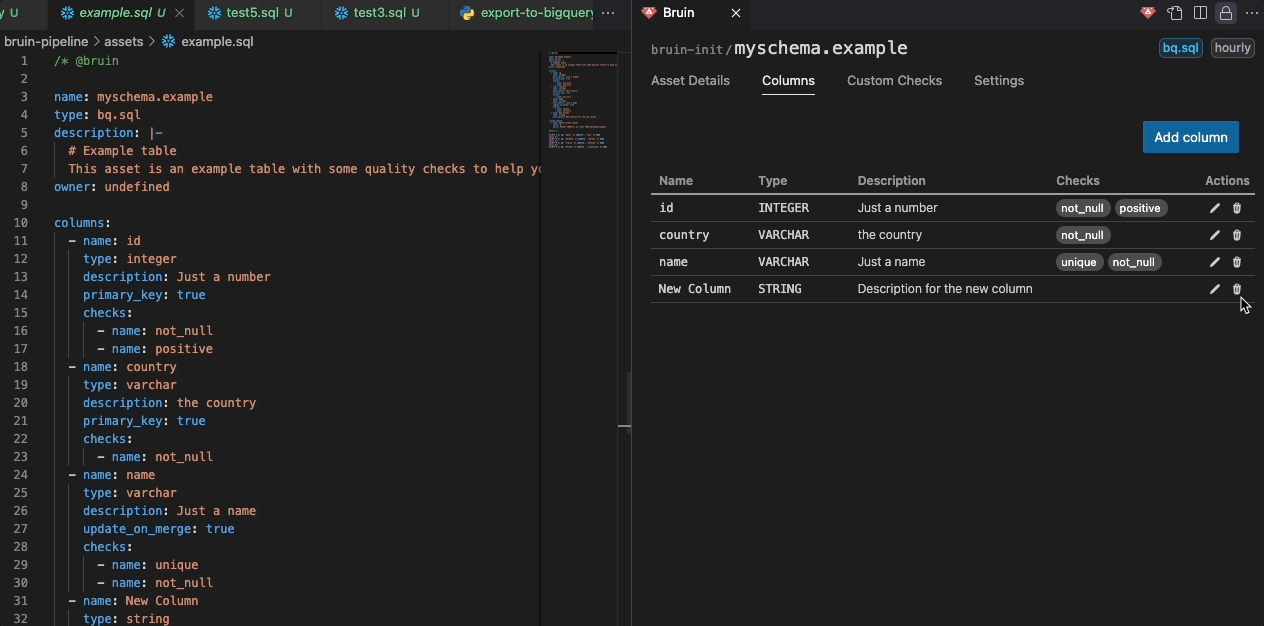
2. Columns
- Lists the columns associated with the asset.
- Each column shows:
- Primary Key: Whether the column is a primary key.
- Nullable: Whether the column can contain null values.
- Name: The name of the column.
- Type: The data type of the column (e.g., string, number).
- Quality Checks: Any quality checks linked to the column.
- Description: A brief description of the column's purpose.
- Owner: The owner of the column.
- Glossary Integration:
- Columns sourced from the Glossary are marked with a link icon.
- Clicking the link opens the corresponding glossary for more details.
- Edit Capability:
- Edit Name, Type, and Description: Modify column properties directly within the UI.
- Add or Remove Columns: Easily insert new columns or delete existing ones.
- Manage Quality Checks: Add or remove quality checks.
Fill from DB
The Columns tab includes a "Fill from DB" feature that allows you to automatically populate column information from your database:
- Auto-populate Columns: Retrieve column definitions directly from the connected database
- Background Processing: The fill operation runs in the background rather than in the terminal for a smoother experience
- Column Sync: Automatically sync column names, types, and constraints from your database schema
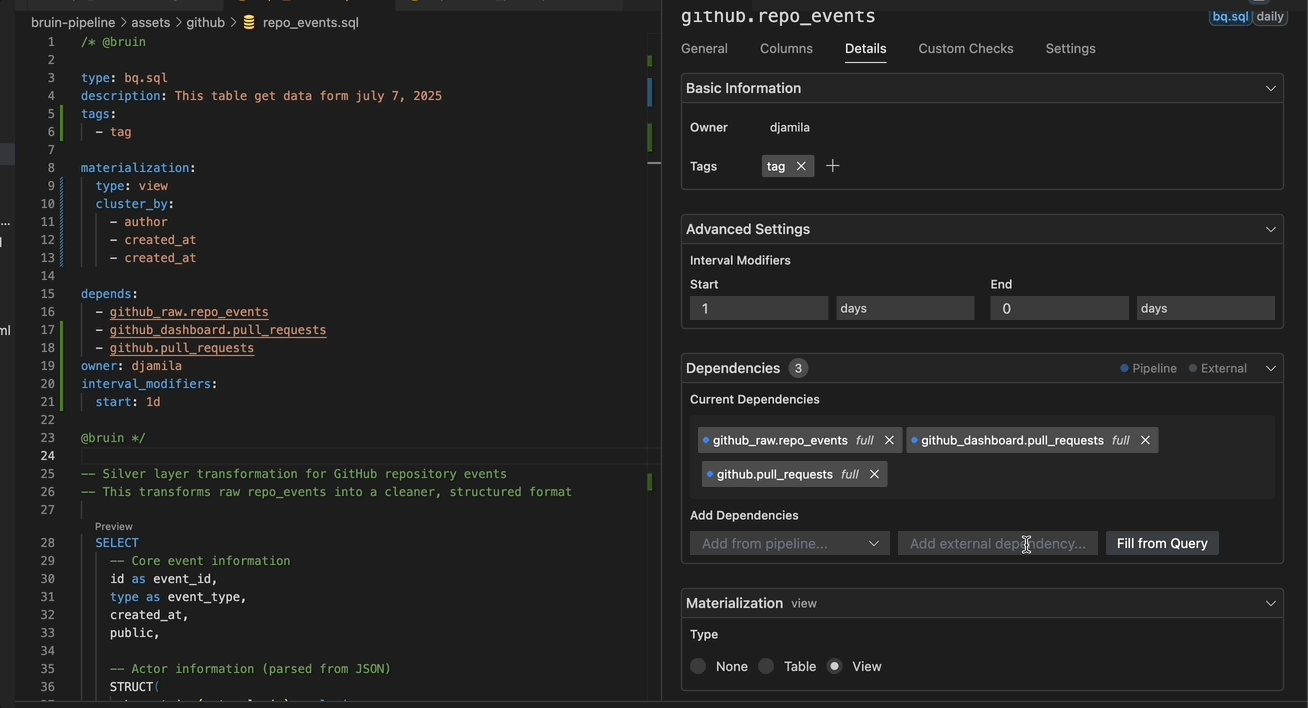
3. Details
The Details tab lets you configure asset metadata and database settings. It has a collapsible interface that auto-saves changes.
Basic Information
Owner Management
- Click to edit owner with inline editing
- Changes auto-save
Tags Management
- Add/remove tags with inline editing
- Tags display as visual badges
- Changes update immediately
Advanced Settings
Interval Modifiers
Set start/end intervals with units:
- Start: Beginning of the interval
- End: End of the interval
- Units: months, days, hours, minutes, seconds
Partitioning
- Searchable dropdown to select partition columns
- Manual entry for expressions like
date(col_name) - Shows selected partition columns
Clustering
- Multi-select dropdown for cluster columns
- Checkboxes for easy selection
Dependencies
Current Dependencies
- List of existing dependencies
- Type indicators (Pipeline/External)
- Dependency counts
Dependency Mode
- Toggle between "full" and "symbolic" modes
- Tooltips explain each mode
Pipeline Dependencies
- Searchable dropdown to find pipeline assets
- Multi-select support
External Dependencies
- Text input for external dependencies
Fill from Query
- Auto-populate dependencies from SQL analysis
Materialization
Materialization Type
- Radio buttons: None/Table/View
Strategy Selection
Dropdown with strategies:
- Create+Replace: Drop and recreate table
- Delete+Insert: Delete existing data, insert new records
- Append: Add new rows without modifying existing
- Merge: Update existing rows, insert new ones
- Time Interval: Process time-based data
- DDL: Use DDL to create table
- SCD2 by Time: Slowly Changing Dimension Type 2 by time
- SCD2 by Column: Slowly Changing Dimension Type 2 by column
Advanced Options
- Incremental Key: Text input for incremental key column
- Time Granularity: Dropdown for date/timestamp granularity
Interface Features
Collapsible Sections
- Expandable sections with chevron indicators
- Remembers collapsed/expanded state
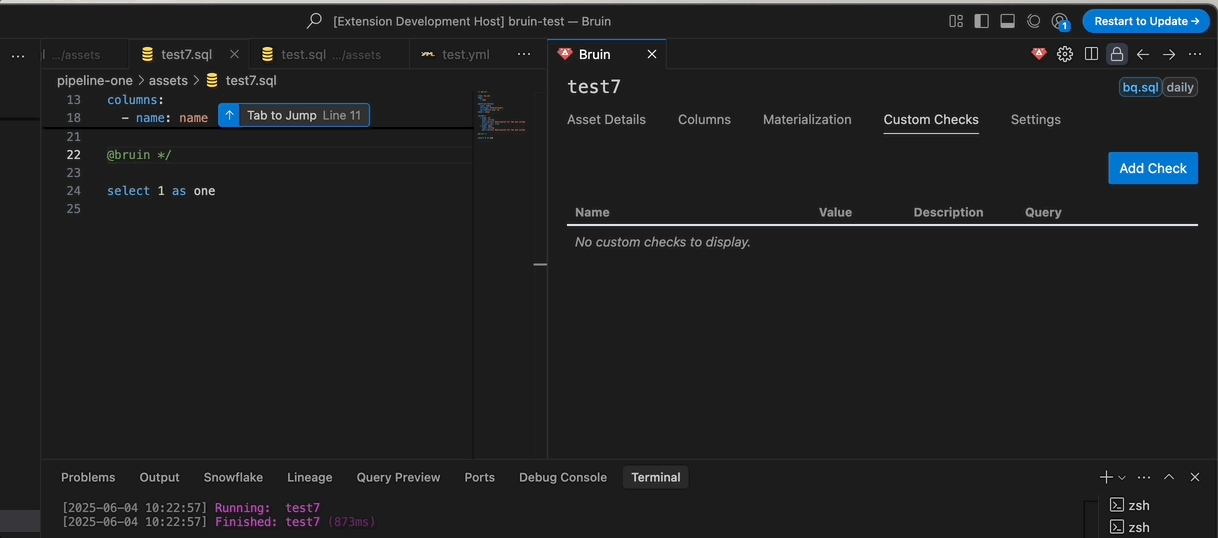
4. Custom Checks
The Custom Checks tab allows you to manage custom checks for your assets directly from the UI.
How to Use
Add a Custom Check:
- Click the "Add Check" button.
- Enter the details for your custom check:
- Name: Provide a descriptive name.
- Value: Set the expected value or threshold.
- Count: Set the number of rows to check.
- Description: Add a brief description of the check.
- Query: Input the SQL query for validation.
Edit a Custom Check:
- Click the edit icon (pencil) next to the check you wish to modify.
- Make your changes in the provided fields.
- Save your changes by clicking the save icon (checkmark), or cancel by clicking the cancel icon (cross).
Delete a Custom Check:
- Click the delete icon (trash can) next to the check you want to remove.
- Confirm the deletion in the dialog that appears.
View Custom Checks:
- All custom checks are displayed in a table, showing their name, value, description, and query.
- SQL queries are syntax-highlighted for clarity.
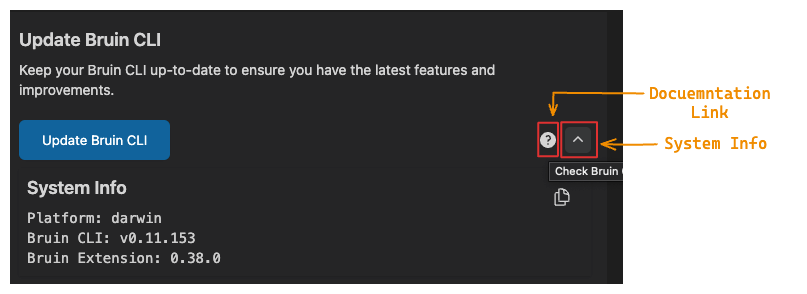
5. Settings
The Settings tab has two main sections:
a. Bruin CLI Management
- Install & Update: Easily install or update the Bruin CLI directly from the UI.
- Quick Documentation Access: A dedicated button redirects you to the Bruin documentation for reference.
- Version Details & Debugging: A chevron down arrow expands to reveal:
- Bruin CLI version
- Your operating system version
- VS Code extension version
- These details can be copied for debugging purposes.
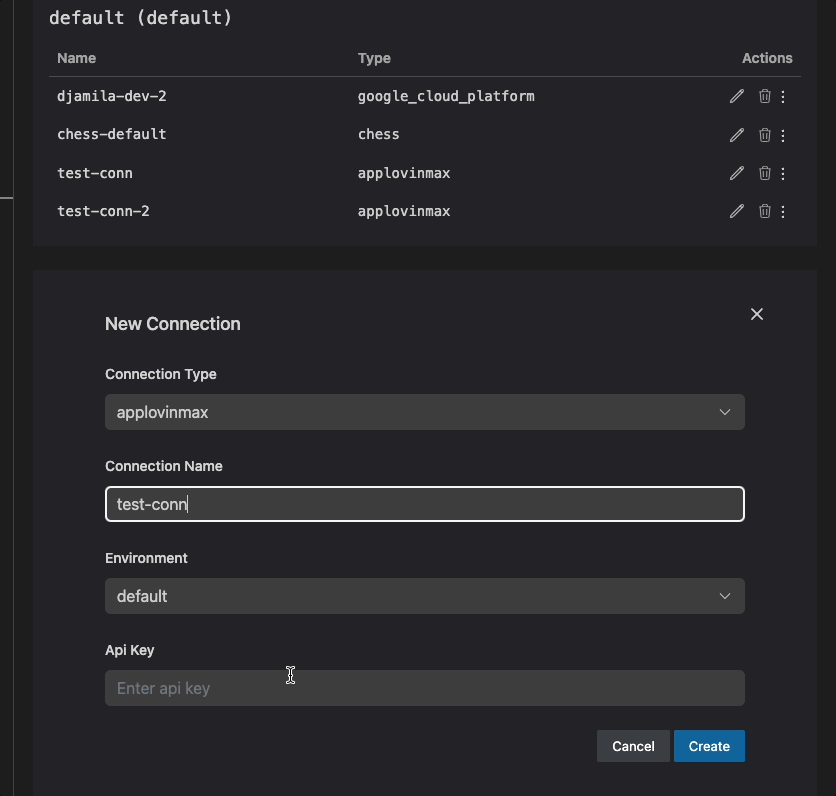
b. Connection and Environment Management
- You can manage your connections, and environments, including:
- Add Environment: Enter the name to add a new environment. This will display a new connection list with an empty connection, allowing you to add a new connection to this environment.
- Delete/Update Environment: Inline edit existing environment name or delete the environment.
- Add Connection: Add new connections by entering the required credentials. If the connection name already exists in the same environment, an error will be displayed.
- Duplicate Connection: If some connections share similar credentials, it's easier to duplicate and modify them as needed. This is fully supported.
- Update Connection: Update existing connections.
- Delete Connection: Delete existing connections.
- Test Connection: This allows you to test your connection directly from the UI. Unsupported connections will display a message indicating they cannot be tested.