Snowflake Assets
Bruin supports Snowflake as a data platform.
Connection
In order to set up a Snowflake connection, you need to add a configuration item to connections in the .bruin.yml file.
There's 2 different ways to fill it in
    connections:
      snowflake:
        - name: "connection_name"
          username: "sfuser"
          password: "XXXXXXXXXX"
          account: "AAAAAAA-AA00000"
          database: "dev"
          schema: "schema_name" # optional
          warehouse: "warehouse_name" # optional
          role: "data_analyst" # optional
          region: "eu-west1" # optional
          private_key_path: "path/to/private_key" # optional
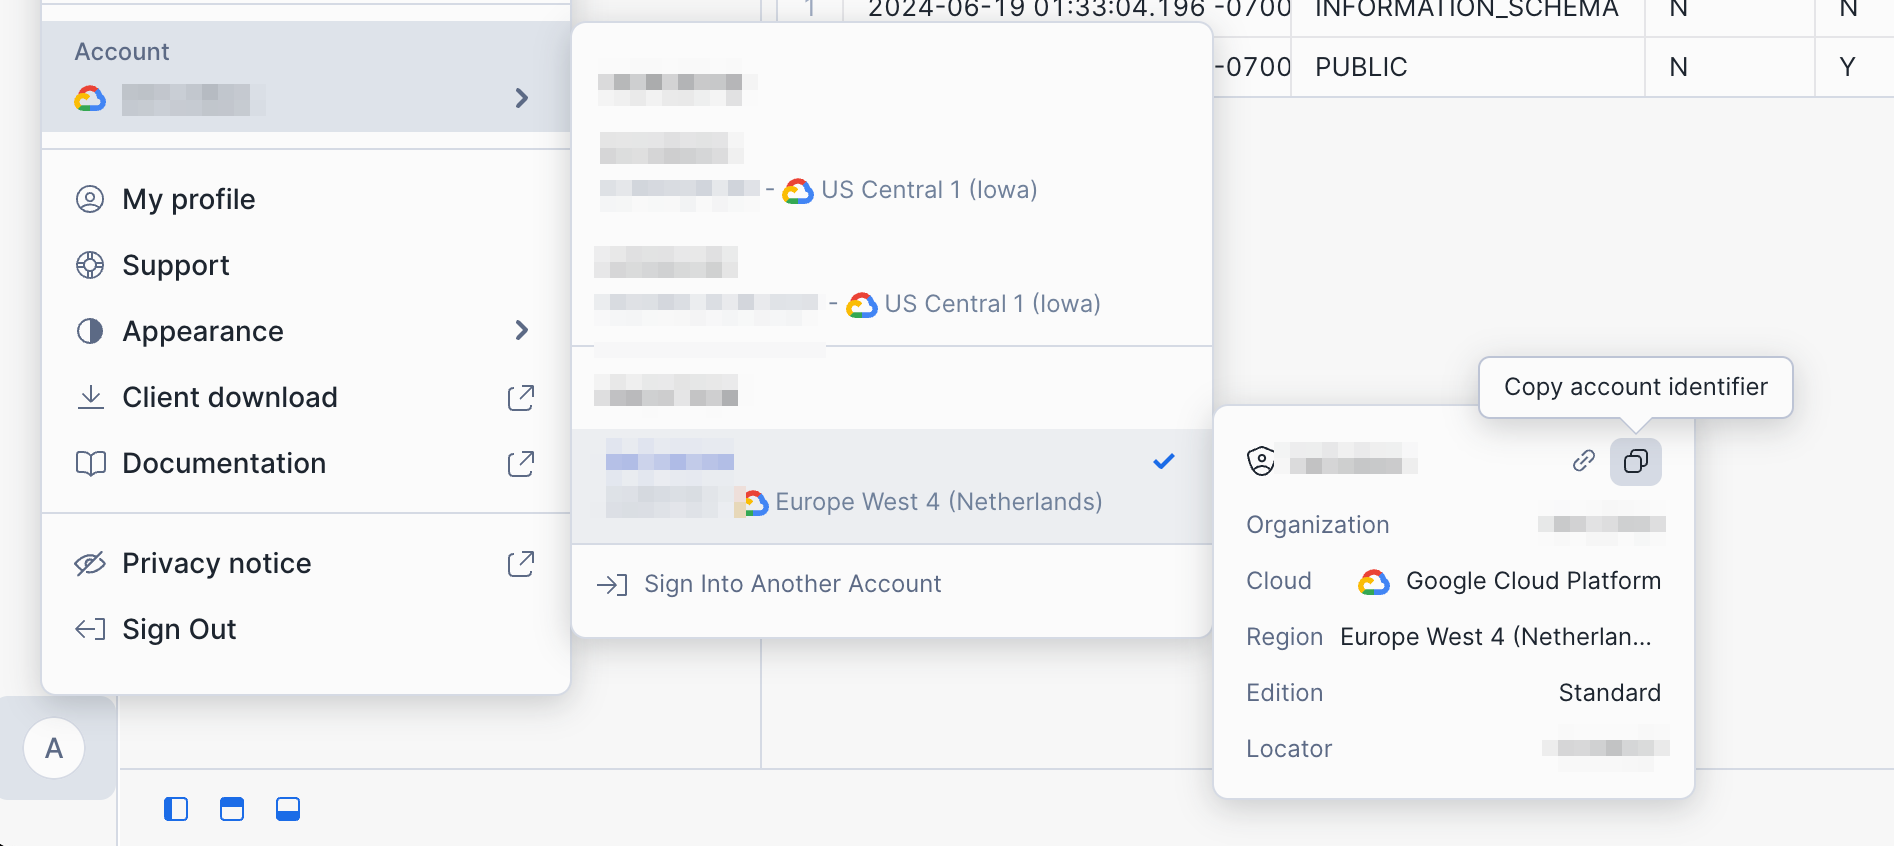
Where account is the identifier that you can copy here:

Key-based Authentication
Snowflake currently supports both password-based authentication as well as key-based authentication.
You can configure the private key in two ways:
Option 1: Private Key File Path
    connections:
      snowflake:
        - name: "connection_name"
          username: "sfuser"
          account: "AAAAAAA-AA00000"
          database: "dev"
          schema: "schema_name" # optional
          warehouse: "warehouse_name" # optional
          role: "data_analyst" # optional
          region: "eu-west1" # optional
          private_key_path: "path/to/private_key" # optional
Option 2: Private Key Content (Direct)
    connections:
      snowflake:
        - name: "connection_name"
          username: "sfuser"
          account: "AAAAAAA-AA00000"
          database: "dev"
          schema: "schema_name" # optional
          warehouse: "warehouse_name" # optional
          role: "data_analyst" # optional
          region: "eu-west1" # optional
          private_key: |
            -----BEGIN PRIVATE KEY-----
            OEKLvQIBADANBgkqhkiG9w0BAQEFAASCBKcwggSjAgEIAoIBAQC0Xc2pIYcLxdve
            E+J5c5f...
            -----END PRIVATE KEY-----
In order to set up key-based authentication, follow the following steps.
Step 1: Generate a key-pair
Open your terminal and run the following command to create a key pair. If you’re using a mac, OpenSSL should be installed by default, so no additional setup is required. For Linux or Windows, you may need to install OpenSSL first.
openssl genrsa 2048 | openssl pkcs8 -topk8 -inform PEM -out rsa_key.p8 -nocrypt
openssl rsa -in rsa_key.p8 -pubout -out rsa_key.pub
Step 2: Set public key for Snowflake user
Log into Snowflake as an admin, create a new worksheet and run the following command (don't forget the single quotes around the key):
ALTER USER your_snowflake_username
SET RSA_PUBLIC_KEY='your_public_key_here';
Step 3: Verify
DESC USER your_snowflake_username;This will show a column named RSA_PUBLIC_KEY. You should see your actual key there.
Step 4: Update Bruin configuration
In your .bruin.yml file, update the Snowflake connection configuration to include the private_key_path parameter pointing to your private key file. For example:
            snowflake:
                - name: snowflake-default
                  username: JOHN_DOE
                  account: EXAMPLE-ACCOUNT
                  database: dev
                  schema: schema_name
                  warehouse: warehouse_name
                  role: data_analyst
                  region: eu-west1
                  private_key_path: /Users/johndoe/rsa_key.pem
For more details on how to set up key-based authentication, see this guide.
Snowflake Assets
sf.sql
Runs a materialized Snowflake asset or a Snowflake script. For detailed parameters, you can check Definition Schema page.
Example: Create a table using table materialization
/* @bruin
name: events.install
type: sf.sql
materialization:
    type: table
@bruin */

select user_id, ts, platform, country
from analytics.events
where event_name = "install"
Example: Run a Snowflake script
/* @bruin
name: events.install
type: sf.sql
@bruin */

create temp table first_installs as
select
    user_id,
    min(ts) as install_ts,
    min_by(platform, ts) as platform,
    min_by(country, ts) as country
from analytics.events
where event_name = "install"
group by 1;

create or replace table events.install
select
    user_id,
    i.install_ts,
    i.platform,
    i.country,
    a.channel,
from first_installs as i
join marketing.attribution as a
    using(user_id)
sf.sensor.table
Sensors are a special type of assets that are used to wait on certain external signals.
Checks if a table exists in Snowflake, runs by default every 30 seconds until this table is available.
name: string
type: string
parameters:
    table: string
poke_interval: int (optional)Parameters:
table: Indatabase_id.schema_id.table_idorschema_id.table_idformat. Ifschema_id.table_idis provided, the database will be taken from the database configuration in the.bruin.yml.poke_interval: The interval between retries in seconds (default 30 seconds).
sf.sensor.query
Checks if a query returns any results in Snowflake, runs by default every 30 seconds until this query returns any results.
name: string
type: string
parameters:
    query: string
    poke_interval: int (optional)
Parameters:
query: Query you expect to return any resultspoke_interval: The interval between retries in seconds (default 30 seconds).
Example: Partitioned upstream table
Checks if the data available in upstream table for end date of the run.
name: analytics_123456789.events
type: sf.sensor.query
parameters:
    query: select exists(select 1 from upstream_table where dt = "{{ end_date }}"
Example: Streaming upstream table
Checks if there is any data after end timestamp, by assuming that older data is not appended to the table.
name: analytics_123456789.events
type: sf.sensor.query
parameters:
    query: select exists(select 1 from upstream_table where inserted_at > "{{ end_timestamp }}"
sf.seed
sf.seed is a special type of asset used to represent CSV files that contain data that is prepared outside of your pipeline that will be loaded into your Snowflake database. Bruin supports seed assets natively, allowing you to simply drop a CSV file in your pipeline and ensuring the data is loaded to the Snowflake database.
You can define seed assets in a file ending with .asset.yml or .asset.yaml:
name: dashboard.hello
type: sf.seed

parameters:
path: seed.csvParameters:
path: The path to the CSV file that will be loaded into the data platform. This can be a relative file path (relative to the asset definition file) or an HTTP/HTTPS URL to a publicly accessible CSV file.
WARNING
When using a URL path, column validation is skipped during bruin validate. Column mismatches will be caught at runtime.
Examples: Load csv into a Snowflake database
The examples below show how to load a CSV into a Snowflake database.
name: dashboard.hello
type: sf.seed

parameters:
    path: seed.csv
Example CSV:
name,networking_through,position,contact_date
Y,LinkedIn,SDE,2024-01-01
B,LinkedIn,SDE 2,2024-01-01